Wednesday, November 21, 2012

Oh the places you'll go...

We have lived in a lot of places.  We are new to Winston-Salem and people are always asking "Where are you from?"  I usually answer-"I grew up in SC, my husband is from Texas and we are most recently from Athens, GA.

That is the simple answer to the polite question folks ask, they don't really want to know that we have moved more times that I care to tell, lived in several states, some more than once.

To document all the places we are "from,"  I created a really cute photo collection using some inspiration from pinterest and old licence plates that we somehow collected.

Here is the result:

I used cheap ikea frames, cut out a map (free from most state welcome centers on the highway or their tourism websites), some little heart stickers, and ribbon.
They turned out super cute I think.  Now we have a way to show folks all the places our family has lived and loved.  


Monday, November 12, 2012

Looking for a deal on Holiday cards?

I've got one for you!
Cardstore

Cardstore.com is offering 70% off all holiday, photo, and greeting cards right now until November 15 with coupon code: CCN2170.

You can get a customized photo card starting at $1.09 per card- with 70% off cards are as low as .33 each! Here is the best part- if you order a bunch- like me, you can get them cheaper.  100 cards are .20 each!
They have tons of cute designs in flat cards, post cards, and folded greeting cards.

Here is the even better part- THEY WILL MAIL THE CARDS FOR YOU!!!! FREE!
Yep- you can upload your address book and have the cards mailed to your Christmas Card list for just the price of the card.  They let you schedule the delivery date up to a year in advance.

So for less than I can buy the stamps, I have mailed out just under 100 Christmas cards.  I have finished my Christmas card mailings for this year!:)  You better hurry- the offer ends November 15!

Holiday Icons Collage 7x5 Flat Card    Merry Christmas Bow 4x8 Flat Card   Holiday Christmas Trees 5x7 Flat Card

Friday, October 26, 2012

Weekend Recipe: Banana Nut Muffins

I've monkeyed around with a recipe until I have a favorite banana nut muffin. Here it is for your weekend enjoyment:

Ingredients:
1 1/3 cups all purpose flour
1 1/2 tsp baking powder
1 tsp salt

4-5 VERY ripe bananas-the more spots the better
2 cups walnuts, toasted
1 cup sugar
2 large eggs
1/2 cup whole milk
6 tbsp butter, melted and cooled a bit

1. toast the walnuts, either in the oven on on the stove in a dry skillet. Watch them closely and keep them moving around. They will smell nice and toasty when they are done. Let them cool while you prep the rest of the ingredients.

2. Preheat the oven to 425.

3. In a medium bowl, mix all the dry ingredients- flour, salt, and baking powder. Set aside.

4. In a food processor, mix 1 1/4 cups of the toasted nuts and the sugar. Process until it looks like damp sand.

5. coarsely chop the remaining nuts and set aside.

6. In a large mixing bowl mash up the bananas. add the sugar/nut mixture, butter, eggs, milk. Whisk together until well combined.

7. Add the flour mixture to the banana mixture and whisk just until there are no streaks of flour remaining.

8. Fold in the remaining chopped nuts and then in the words of a favorite tv chef- "just walk away." Let the batter rest for 15 minutes or so while you prep the pan.

9. Spray your muffin tins liberally with non stick spray or preferably the bakers spray with flour in it. Prep 12 muffin cups.

10. Scoop the batter into the muffin cups filling them almost completely. If you want shorter muffins fill them less full and you'll get a few more muffins from your batch. I like big muffins:) so I fill 'em up!

11. Bake at 425 for 17-18 minutes, checking for doneness. Cool in the pan for 10 minutes, then turn out and cool on a rack.

Enjoy!!

Saturday, October 6, 2012

sew simple

I was creative today!  This project was inspired by this Pin.
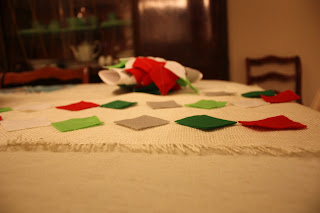
I put together some felt garland along with a cute burlap table runner.


I wanted to create some garland made with felt shapes, in fall colors, sewn together.
I picked up some felt sheets and cut them into squarish shapes- I wanted my garland to be less uniform (a.k.a -it's easier to cut crooked squares vs. precise ones vs. circles).

I created the color pattern I wanted and then started sewing through diagonally one after another until I was done!  You don't really even have to sew in a straight line!

I originally thought I was going to use the garland on the mantle- but it just looked too busy and didn't fit with our living room style so I hung it up in the kitchen/dining room and was even more inspired to make up a super easy and quick table runner to use with the garland on the table.

To make the table runner:
I cut the burlap to the size I wanted for our table and then pulled out threads from the loose weave until I had the edges frayed to the length I wanted.
Once the edges were frayed, I sewed around the entire runner on the edge of the non frayed burlap.  I trimmed the edges so they were all the same and pressed it- Done!

Onto the the table went the runner and I just laid the felt garland on top.  I hung the rest between the kitchen and dining area.


It was so quick and easy I even sewed up some garland in Christmas colors.  I can just switch out the garland in a couple of months for the Holidays!

Saturday, September 15, 2012

in pursuit of a cookie

For YEARS I have been trying to replicate the recipe for Cherry Ice Box Cookies from Collins Street Bakery in Corsicana, TX.
(I've posted on this before)

They are absolutely DIVINE!  One of my favorites of all time-and when we are in TX we will drive out of the way to buy some.  If you get a real craving, the Collins Street Bakery will ship anywhere in the lower 48...

However, I, rather than just have them shipped, have been monkeying around with various recipes for literally years now in an effort to come close to this cherry cookie perfection.

In the last year though, I've hit the jackpot- it started with an episode of America's Test Kitchen (we love some PBS in this house).  They baked the perfect chewy sugar cookie and they just looked so good I had to try it.  So I baked some up and true to the promise- they were the best chewy sugar cookie I'd ever eaten.  As soon as I took a bite I knew I was close to the cherry cookie winner.

I mixed up another batch and added cherries.
Oh. My. Goodness.  I'd done it.
These are not exactly like the TX bakery version, but they are rich, chewy and oh so close.

To mix up some you need to visit America's Test Kitchen and start with their recipe for Chewy Sugar Cookies.

Follow the recipe directions exactly.  When you are prepping ingredients take 2/3 cup of maraschino cherries and 1/3 cup candied cherries (you know the kind in fruit cake- find them in the produce dept. usually or baking aisle) and chop them up- minced really.  You can do these without the candied cherries just use a whole cup of maraschino.

Drain the chopped cherries really well in a colander while you mix up the sugar cookies.
***If the cherries are too juicy they will make the cookie dough too thin and they cookies won't come out right.  I put them in a clean tea towel and squeeze out some of the juice.

Once the dough is mixed up, add in the cherries - I fold them in with a rubber spatula.

Finish according the the sugar cookie recipe by rolling them in granulated sugar and baking at 350.  LET THEM COOL ON THE PAN!  Then enjoy:).


the best cup of coffee I ever drank

7 years ago today, I was invited by one long tall handsome Texas Aggie to have coffee with him at the "Brooks Bistro" (really his kitchen table in the old Brooks Hall directors apt. at Baylor University).

It was Folgers decaf with skim milk- not great coffee (read: really bad) at all but, because I really liked him and really wanted to get to know him, I'd have drunk mud:). It turned out to be the best cup ever because it was our first date of many.

7 years, 3 graduate degrees, 3 states, 2 kiddos, and more moves than I care to say- he is still the best man I've ever met.

I Love you Larry Correll-Hughes!

Here's to better coffee, and more years of great conversation, laughter and adventure!

Friday, September 14, 2012

It Feels Like Fall!

The weather here has been just fantastic lately. Cool mornings, mid 70's all day, blue skies. Fall is in the air...

I couldn't resist adding the fall leaves to our front door wreath. I made the family wreath right before Lucy was born and we know we are home when we hang it on the door. The decorations get changed out for each season/holiday or we just leave plain too.

I love this time of year! I am resisting the urge to pull out the pumpkin stuff until October!

Thursday, September 6, 2012

What I did today...

sewed!

I have found some fun pins for easy looking sewing projects on pinterest.  I've been sewing for a while, but I love a simple project I can whip up in an afternoon and this pin for a peasant dress fit the bill.

I ordered some really cute fabric from Hawthorne Threads, one of my favorite online fabric shops, and wanted to see how this dress turned out before I use the new (pricey) fabric.

I picked some cute coordinating fabric from the stash and first embroidered a cute monogram patch, then I sewed this little dress:


I think it turned out really cute!  Lucy has worn it all afternoon.  As I finished the sleeves and ironed it, she kept saying "wear new dress!"  A little fashionista in the making:).

Sunday, September 2, 2012

What's for dinner?

Homemade bread, "fried" pears picked from the tree in the back yard, bacon, and blueberries. Yum!
Lately...

We have officially settled into our new house.  It isn't ours exactly since it is provided by the university as a part of Larry's compensation package, but it is the first house we have lived in ever as a family.  

We moved to Winston-Salem at the end of June and have been busy unpacking, getting the house set up and are now in the fun part of decorating and putting the finishing touches on our new place.  

Winston is a great place to live- it has all the convenience of a bigger city,with the attitude of a small town.  we especially have enjoyed all the great activities for children and families.

Brooks loves having a big backyard and a place to ride his bike.  Lucy follows close behind, usually doing her best to find something completely inappropriate to put in her mouth- various plants, fallen fruit (we have 2 pear trees and an apple tree in our yard!) sand, rocks, etc.


We have enjoyed the local farmer's market. The kids love some fresh watermelon!


Thursday, August 30, 2012

Kid Art Gallery

Once again, this is a post about a project that has been waiting for a more permanent home.  Not that I couldn't have done this in any of the other places we've lived, but when I saw the idea on Pinterest, we were in the holding pattern before finding a new job/moving.

Now that we are settled, I have just relished getting to actually get to take some of the pins from my Pinterest boards and make them into real projects. 

Brooks has been coming home from nursery school for a couple of years now with lots of artwork and crafts and so far the fridge has been the best place to display it until now.

With a few cheap (really cheap) frames and a can of my favorite- spray paint  I created a really cute gallery for kid art!


The frames came from Goodwill- a favorite place to shop!  I chose 5 in a variety of shapes and designs.  The most expensive was $3.00.  I took all the glass and artwork out and recycled it.  I sanded the frames lightly and then spray painted them all the same color with a glossy orange to match our playroom decor.  
I wrestled with painting them all the same color or each a different color, but ultimately chose the same color since artwork would add more color.  

I played around with the layout and then hung them up with nails.  Binder clips are attached to the wall inside each frame with poster mounting tape.


Brooks gets a kick out of hanging his artwork on the wall (so does Lucy, when I can get her to sit still enough to actually color something). I love that it is super easy to display and change out artwork and projects in a way that isn't cluttered looking.  I like the intentionality in showing off and celebrating the creativity of my children.


Tuesday, August 28, 2012

You've got to try this

"fresh bread would be great with dinner tonight." This was my thought as I prepped our meal at 5:30 this evening.

You might think it was a bit late for me to attempt fresh bread but thanks to www.artisanbreadinfive.com it's a snap.

I started these loaves at 6:15 and by 7:30 have beautiful crusty hot bread ready for dinner.

I randomly stumbled across the blog of two cook book authors called "artisan bread in 5 minutes a day."

I bought it on my kindle and have loved trying all the great recipes for great tasting easy bread. The authors have figured out the must do things for great bread and in turn left out all the steps that are not necessary.

Purist bakers may not like this method but I love it! You've got to try it!

Our Year in Pictures

Not really in this post- BUT I did finish a great project this week and had to share!

Several years ago I saw a set of frames in a friend's home, each with a different month of the year painted on the frame.  They were hung all together and chronicled the family's year in fun candid pictures- one per month. I thought they were just wonderful and whimsical and a great way to celebrate the family.

I've always wanted to have something like it in my home, but for so long we've been living in what I considered "temporary" places, putting 12 nail holes in the wall in one spot seemed impractical.  Seriously, the longest we've lived anywhere in the past 6 or so years is about 2 years in a row.

I have now figured out how to have my 12 "frames of the month" and only put 1 hole in my wall!  I will also confess the inspiration came from... you guessed it...Pinterest!
This project involves all my favorite Pinterest resources: Goodwill, Hobby Lobby, spray paint, and the Dollar Store!


For the The Big Outer Frame:
Step 1: Find a big frame.  I found a huge (ugly) framed print at Goodwill and removed the print and glass.  I spray painted the frame white.  The print and the glass went into recycling.

Step 2: Create the fabric covered insert for the big frame.  I had a thin sheet of plywood cut to fit the frame at the local big box home improvement store.
I covered the plywood with a layer of spray adhesive and then some fun fabric (hot glue the fabric on the back).

Step 3: Secure the fabric covered wood into the frame.  I used some hot glue and my staple gun.

For the Small "Month" Frames:
Step 1: Buy 12 frames at the Dollar store.  Step 1.5: I found  5x7 frames that had the width I wanted and spray painted them silver.  They had smaller silver frames, but I just liked the larger size.  I added mats that made the picture opening 4x6.  The mats were also from the dollar store- 3 in a pack for a buck!

Step 2:  Add the months to each frame.  I found some great clear stickers at Hobby Lobby in the scrapbook section that were uniform and the kind of graphic style I wanted.  I stuck them to the bottom of each frame right onto the glass.  The whole sheet of 12 stickers was $3.00.  If you wanted each month to be more unique and reflect he holiday or season, I am sure there are stickers or embellishments that would accommodate.

Step 3: Select Pictures for the frames.  This was the best part!  It is also a great motivation to have some of the hundreds of digital pictures I have stored in various places actually PRINTED!


Final Assembly:
I use Velcro to attach the small frames to the larger because it made the monthly removal and picture change easier.  You could use nails or hooks depending on what kind of hanging apparatus came on the smaller frames.

Step 1:  Play around with the layout.  I went back and forth between a horizontal lay out with a 3x4 grid or a vertical layout with a 2x6 grid.  I chose the vertical because it fit best in the place I really wanted to hang the finished project.
I got the layout  of the frames where I wanted them and then measured where the center of each column was and placed the Velcro strips in the center of each line.

Step 2: Attach Velcro to the fabric covered wood. The Velcro was the permanent sticky type but I also stapled it into the wood for good measure.

Step 4:  Put the other part of the Velcro on the small frames.  I had to trim the Velcro to fit the width of my frames.  The Velcro was also sticky enough that I didn't think any staples or glue was necessary.

 Step 5: Affix the small frames onto the big one and hang it up!

I hung our Year in Pictures in our dining area.  All total I have about $33 in this project and that includes all the frames, paint and Velcro.  The kiddos love it and have stopped to look at it multiple times daily.  Brooks keeps asking- "how many months until Christmas?  or my birthday?"  So we get to practice counting and the months of the year using our frames:).


Friday, June 15, 2012

Lately...

May/June have been SUPER busy months so far-  really.  This will be a long post- but hopefully it's ok because there are a lot of pictures.

In May the most momentous thing was celebrating Larry's graduation with his PhD from the University of Georgia!  He is officially Dr. Larrry Correll-Hughes.  We had a great but jam packed weekend celebrating graduation, Mother's Day and we had Children's Sunday at church, where I preached.  Here are some photo chronicles of the events:

 Larry at the famous UGA Arch- we actually took this photo a couple of week before graduation and already people were lined up to snap pics here.


 Right after the graduation ceremony with the kiddos

 Larry with his sister Sarah and nieces, Katerina and Victoria
Larry's mom and dad


Children's Sunday/Mother's Day service-a really great day!

The cousins all together (sort of)


Later in May Brooks finished up his three year tenure at Tuckston Learning Center.  He had a great year at Nursery School and we loved his teachers, Mrs. Mary and Mrs. Laurie SOOOO much.


After the events of May we went into June where our church put on an AMAZING week off VBS led by me:)!  This was the last major event I led as a part of my job as Assoc. Pastor for Children at Milledge Avenue Baptist Church.  I got a couple off good pictures of Brooks and Lucy during the week.


Finally and most recently, some great friends from church, Carey and Denise Huddlestun invited us to go with them to the Peachtree Dekalb airport to play and watch planes take off and land.  The kiddos had so much fun and we got to see the Memphis Belle (the plane they used in the movie) !
 Watching the planes take off and land!


 They had a great playground right by the runway.  Brooks and Lucy had BIG fun!
 Mrs. Denise helping Lucy on the slide.
A family pic by the Memphis Belle

Wednesday, May 23, 2012

Things Brooks' Says

Conversation with Brooks (age 4) on the way to pick up the babysitter:

Brooks:  Are you gonna be sad when I go to college.
Me:  yes, I'll probably cry because I'll miss you.
Brooks: well you don't have to cry, you know.  Daddy will still be with you and Lucy will love you.
Me: what about you?  will you still love mommy?
Brooks:  (*nods and grins)  Yep,  you don't have to cry when I go to college because I will come back from college to see you.

*sigh* I just know I'm gonna blink and that day will be here.

Saturday, March 17, 2012

Happy Birthday Brooks!

Our sweet boy turned four this month- FOUR!  I can hardly believe it!  Somehow his birthday celebrations turned into a week long extravaganza.

Monday the 12th (his actual birthday) he woke up to streamers, balloons and birthday pancakes.

 He had a great day playing with some birthday presents and finished the day by going out with the family to pick out his big  present- a big boy bike!


On Friday Larry surprised brooks by waking him up early and taking him on an "adventure."  They traveled on the Megabus from Athens to Atlanta.  In Atlanta they rode the train (Marta) and went downtown to Centennial Olympic park and had fun playing on the playground and visiting the World of Coke.

On Saturday, we had Brooks' birthday party.  It was a Dinosaur adventure!


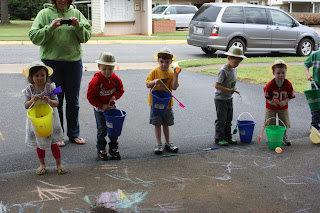
 The kiddos drew dinosaurs with sidewalk chalk and then threw water balloons at them to make them "extinct."


 Next they were paleontologists discovering "dinosaur bones" in our sand box.

 Cake and icecream!

 Lucy had her share of cake and ice cream too!


 The plan was to have a dinosaur egg hunt outside, but the rainy weather kept us inside to discover dinosaur eggs had been put in their explorer buckets :).  Our dinosaur eggs were filled with candy, toy dinosaurs and dino tattoos.

 Lucy got in on the dino egg fun.